Home & Contact

How to Make Mortise and Tenon Joints

Step1: The first thing you must do is mark out the mortise or tenons and you can start with the tenons. To mark out the tenon you need to start by drawing a line around the entire piece of wood to create the length of the tenon.

The tenon length is usually about 2/3rds the depth of the piece of timber it is being inserted into. Now you must mark your tenon width and it should be around 1/3rd the thickness of the timber.

Check to see if the tenon matches the closest size chisel or mortising drill bit and if it doesn’t modify the lines to match the chisel or mortising drill bit.

how to make mortise and tenon joints picture 1

Step2: You must now cut the tenon and there are two methods of doing this the first is with a tenon saw. Put the piece of timber in a vice on a slight angle to create a neater and straighter cut and then carefully cut along the lines.

Next put the timber back upright in the vice and mark around 5 millimetres in from each end although it can be slightly more with larger tenons.

Now cut straight down where you marked to create small cut outs on both sides of the tenon, the reason you do this is to create a neater and more flush joint but it also hides any gaps you may have from your mortises if they are cut slightly to wide.

The second method of cutting tenons is with a band saw and all you have to do is cut along the lines like you do with the saw.

This method is usually better because the band saw has a guide rail making the cuts quicker and more accurate. Remember to cut the shoulders of your tenons first so that you do not cut to far later on.

how to make mortise and tenon joints picture 2                            how to make mortise and tenon joints picture 3

Step3: The next step is marking out the mortise and the first things you need to do is decide where you want to position the joint.

Next you can use your recently cut tenon as a guide for the width of your mortise and you do this by resting it across the timber that will have the mortise and drawing lines along the two edges of the tenon.

After you have the width sorted you must put two more lines in between the ones you have already drawn to create the thickness of your mortise.

The thickness will be the same as the tenons thickness and you can use it again as a template if you need to but remember to measure the space on each side of the mortise to ensure it is centre.

how to make mortise and tenon joints picture 4

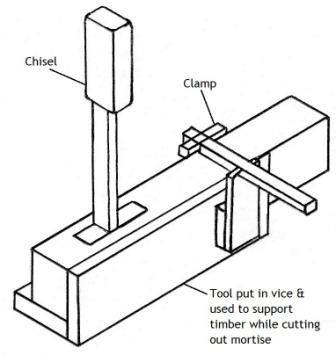
Step4: Now you must cut the mortise and once again there are two methods and the first involves a mallet and chisel.

If you use the first method you need to put some timber in a vice to rest your timber against and then clamp the two bits of timber together to hold them steady but make sure to put some scrap timber in between the clamp so that it does not mark your timber.

Now get the chisel and hammer it straight into the wood with your mallet. Apply some pressure away from the chisel bevel and repeat this on the other side of the mortise to create a V shape.

Work from the centre to the outside of the mortise and be patient meaning do not remove too much timber at once also remember to stop at a depth that is the same as the length of your mortise.

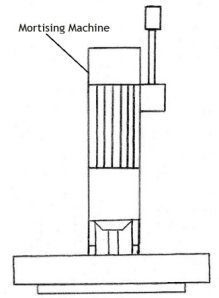
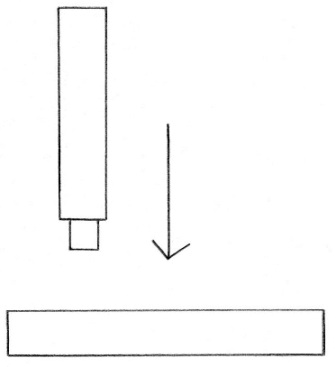
The second method involves the mortising machine and what you must do is set the width and depth before you use it. Once they are set simply drill into your mortise bit by bit to remove the timber.

This method is also the faster more accurate one but remember not to drill too much at once and make sure the gap in the drill bit is facing the empty space of the mortise so the excess timber can escape when it is removed.

how to make mortise and tenon joints picture 5        how to make mortise and tenon joints picture 6

Step5: After you have completed the mortise and tenon check to see if they interlock neatly. If your tenon won’t fit you can shave a minimal amount of timber off with the band saw but do it to both sides.

If the tenon won’t fully interlock with the mortise you have to remove some timber from the mortise that may be stopping it.

Step6: Once you are happy with the joint and it fits flush and neat you can now bond it together with clamps and an adhesive.

Always do a dry clamp first to ensure everything fits and always keep checking for squareness while clamping plus remove the excess glue or you will have glue spots which are hard to remove later.

how to make mortise and tenon joints picture 7

Haunched: If you are making a haunched mortise and tenon all steps are the same except you will leave slightly more timber in the mortise and on the tenon.

The way you cut the tenon is the same only when you make your indents on the sides of the tenon only cut one side. On the other side is where the haunch will be and all you do is cut half way down the tenon to create it.

The mortise will be made at the top of the timber and all you have to do is leave a section that will fit the haunch of your tenon. Instead of cutting this section in the mortise the entire depth of the rest of the mortise leave it half as deep to house the haunched tenon properly.

how to make haunched mortise and tenon joints
  Home
  Contact Me
  Timber
  Solid Timber
  Particle Board
  Plywood
 
MDF
  Veneer
  Joints
  Butt
  Mitre
  Rebate
  Housing
  Halving
 
Dowel
 
Biscuit
 
Dovetail
 
Mortise and Tenon
 
Bridle
 
Tongue and Groove
  Finishes
  Stains
  Oils

  Wax

  Acrylic
  Polyurethane
  Adhesives
  PVA
  Epoxy

  Polyurethane

  Contact Adhesive
  Components
  Nails
  Screws

  Hinges
  Tools
  Hand Tools
  Power Tools

  Machinery
  Facts and Tips
  Hardwood
  Softwood

  Seasoning

  Wood Layers

  Woodwork Tips
Site Map
Copyright © 2010 - 2019 woodworkbasics.com. All Rights Reserved.
Best Viewed in Screen Resolution 1280 × 720 or Higher